 |
| My sheets all dyed! |
Saturday, October 13, 2012
Tie Dye crazy.
Over the summer I became obsessed with tie-dye. I just love the look. This is going to be a rather short post because all I did was follow the instructions the kit came with. I got my kit from walmart and I found that if i just put the caps back on it will save for months. Which is good because I didn't use all of mine up. Although I used different styles for each piece my favorite is the pillow on the left it just turned out so pretty!
Unfortunately, all of my projects lately have been Christmas related. So just expect tons of crafts after the holidays. (yes I know Christmas is like 2 months away)
Friday, October 5, 2012
Lumos. Nox.
 |
| Finished although the picture quality sucks. |
You will need:
*Paint: Black and white
*Sharpie: Silver and black
*Sandpaper
*Light switch cover
*Glitter (optional)
I started by sanding my light switch cover because I knew it would be too glossy for the paint to stick. Then I used black acrylic paint to paint half the switch. I used a post it to keep my line straight (I was lacking painters tape) and then after that side dried I painted to other half in a shimmery white paint. After both sides had dried I wrote Lumos on one end and Nox on the other. Being the glitter lover I am I decided this project needed a final touch of sparkle.
 |
| In the works. |
artwork
So I can't teach you how to draw, because honestly I'm not even so great at it myself. However, I wanted to share some of my favorite art pieces.
 |
| Aladdin. |
 |
| Calvin & Hobbes. |
 |
| Jug. |
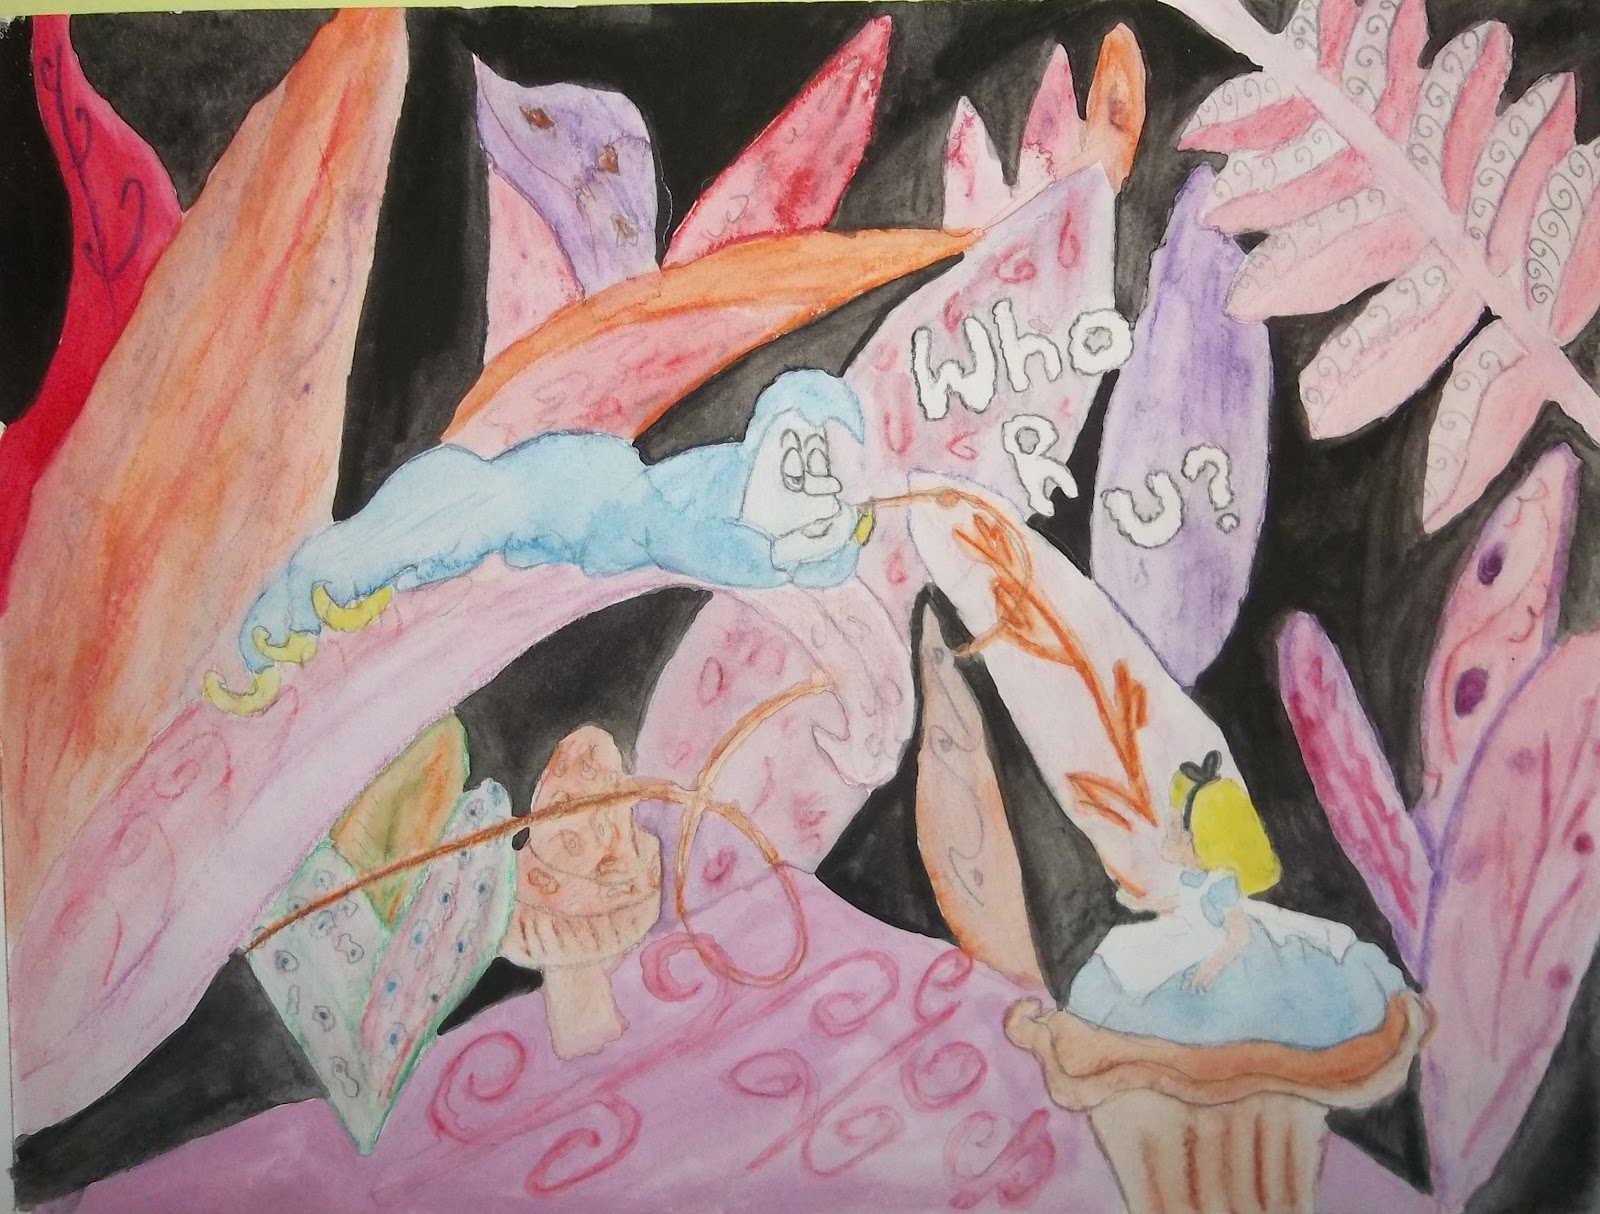 |
| Alice In Wonderland. |
 |
| Up |
Mod Podge and Magazines
 |
| Making a mess (what I do best) |
Lately I have been dying to use mod podge, a glue/sealer that you can buy or make using equal portions of elmer's glue and water. While at Marshalls last week (one of my favorite stores) me and my mom were looking at colorful decretive boxes. She said when she was younger she decorated her own, then she proceeded to tell me how the times have changed...
 |
| Finished box! |
However, this gave me my mod podge idea! I was going to decorate a shoe box in magazine cut outs. I have made so many collages before that this was a piece of cake. So I got some old magazines, scissors, my shoebox, and a glue stick after covering the sides of the box I coated it in something very similar to mod podge. I could not find any elmer's glue in my house but I did find a puzzler sealer to leave your finished puzzles matte and held together. Which is pretty much mod podge.
 |
| Altoids container. |
I also coated an altoids container in magazine scraps giving it a colorful finish, I'm not sure what I will use it for I just wanted to make something else.
Monday, September 17, 2012
Its raining crayons.

For this project you will need:
*Blow Dryer
*Crayons
*Canvas (or something sturdy)
*Hot Glue Gun
Start by deciding how you want your crayons to be arranged, I put mine in rainbow order in a straight line. The hot glue your crayons to your back drop and let them set. Finally you are ready to start the fun, set up your area with newspaper and do this either in your garage or outside. I know from experience that crayon on the carpet makes for a very unhappy mother.
 |
| My second piece, unfinished. |

Finally start blow drying, this takes time and patience. It is good to start with one section and wait until those crayons start melting and then work your way across the canvas. Once the crayons have melted to your hearts content you are finished! The instructions may be short but my crayons took about 45 minutes to melt all the way (my arm really hurt after holding the dryer for so long).
The second crayon melting I did was with pieces of crayons in piles and blowing them out to mix together.
Sunday, September 16, 2012
Simple Accents
So lately I have been doing small projects simple things that add a little something extra to my room or other places. Starting with bows I have so much ribbon laying around in my craft stash that I decided to do something useful with it. My bedroom is bright green, so I tied a green ribbon around the back of my desk chair. My room is accented in purple, one of the purple items is my trashcan. I decided to add a ribbon to this as well. However, tying it would not hold, so I got out to hot glue gun and made the bow more permanent.


 I love glitter, and my friend told me how to cover your phone charger with glitter to make it more distinctive. I chose my own way to do it and simply painted it with nail polish. The smell may be a tad over whelming so you may want to do this out side. I stuck the part of the charger that goes into the wall into a piece of foam so I could easily paint all the sides without getting my hands sticky. Using a white glitter to paint over the whole charger was all you have to do. I waited a few hours to make sure it was dry, and it may smell faintly of nail polish for quite sometime.


 I love glitter, and my friend told me how to cover your phone charger with glitter to make it more distinctive. I chose my own way to do it and simply painted it with nail polish. The smell may be a tad over whelming so you may want to do this out side. I stuck the part of the charger that goes into the wall into a piece of foam so I could easily paint all the sides without getting my hands sticky. Using a white glitter to paint over the whole charger was all you have to do. I waited a few hours to make sure it was dry, and it may smell faintly of nail polish for quite sometime.
Respect the Pouch
 |
| Finished Product! |
You will need:
*Scissors
*A sewing machine
*Something for straps
*24 empty juice pouches (depending on how big you want your bag, more or less)
So to start it would be a good idea to drink all the juices I collected mine over time from friends who I sat with at lunch to get a nice variety of flavors. After acquiring all of the empty juices and a few extra's I got right to work. By cutting a small incision in the bottom of the juice pouch it made it easier to clean, I washed it out with soapy water and then proceeded to do all the others. Having the patience to let them dry was the hardest part for me.
Once dry smooth out and begin sewing, I sewed each pouch side by side across for the front and back then did a second row by sewing four more pouches together then sewing both strips together. The sides consists of four juices (2 by 2) and the bottom also 2x2. Deciding how to sew each side together was a challenge because normally you wouldn't want to see your seam. However, because the capri suns are stiff I choose to let my seam show making the corners stick out.
 |
| The Seam. |
After all my sides were sewn together I patched up and holes by hand sewing them. Finally I added the straps, you could use ribbon but I found a thicker shinny material at Walmart that seemed to better fit my needs.
Thursday, June 28, 2012
Recycled T-shirts
 |
| All done! |
This idea came from pinterest turning an old T-shirt into a headband, very simple and cute.
For this project you will need:
*A T-shirt
*scissors (fabric scissors make the job easier)
*needle
*thread
 |
| Sewed together. |
 |
| Braided together. |
duck tape flowers
I have a major obsession with duck tape, and am constantly trying to make new things from it. I thought hmm flowers that never die, genius although I know I'm not the first to make them but I still thought it would be cool.
What you will need:
*2 rolls of duck tape one green and the other of your choice
*scissors
*straws
First I coated the straw in green duck tape, I ripped it in half so it would not be so bulky. Then you should rip off a strip of your flower color about 2 or 3 inches long. Folding the corner up so there is a strip of sticky tape still exposed and then fold the other corner making a triangle. Once you have about 8 or nine of these can start making your flower or round off the edges with your scissors. I choose to round the edges off so it looks more like a flower although I have made both types.
At last you can put the petals on your stem, the first petal is simply wrapped around the straw about an inch down. The you begin adding the other petals by pinching the petals around your stem make them realistic. Be careful not to lay it flat, you want to crimp the edges to make your flower blossom.
What you will need:
*2 rolls of duck tape one green and the other of your choice
*scissors
*straws
 |
| Supplies |
 |
| Straw covered in tape. |
First I coated the straw in green duck tape, I ripped it in half so it would not be so bulky. Then you should rip off a strip of your flower color about 2 or 3 inches long. Folding the corner up so there is a strip of sticky tape still exposed and then fold the other corner making a triangle. Once you have about 8 or nine of these can start making your flower or round off the edges with your scissors. I choose to round the edges off so it looks more like a flower although I have made both types.
. |
| The first fold of the triangle |
 |
| Finished triangles some rounded. |
At last you can put the petals on your stem, the first petal is simply wrapped around the straw about an inch down. The you begin adding the other petals by pinching the petals around your stem make them realistic. Be careful not to lay it flat, you want to crimp the edges to make your flower blossom.
 |
| In the process. On left and right an example of what the finished petal looks like |
 |
| Finished! |
Friday, June 15, 2012
Something new
 |
| The original craft that I used to make |
For my next craft I wanted to take a simpler approach and find a new use for something I already had. Then I saw a bowl made from craft beads, the ones that can be put on little peg boards then ironed for pointless fun. I happened to have a whole bag full of these beads and was never planning on making those other things again. So I got right to work, the only things I used were craft beads, canola oil, and an oven safe bowl.
 |
| The bowl I used to get my shape. |
 |
| The craft beads, also called Perler Beads |
After throughly greasing the bowl I began to set the beads inside my bowl, making sure none of them overlapped. When the bowl was almost filled to the brim all that was left was to put my creation in the oven. I started at 300 degrees for 20 min, sadly after looking into the oven it did not look as any of the beads would ever melt. Deciding more heat was the solution I kicked up the heat to about 400 degrees and in no time the beads were all melted.
Having the patience to wait to take out the bowl was the hardest part, once I had waited for it to cool my new bowl slid out effortlessly and I now had a perfect place to set my keys when I walked into my bedroom. Although I must have washed the bowl about four times because of how greasy it got, all my efforts where worth it.
 |
| Greasing the bowl. |
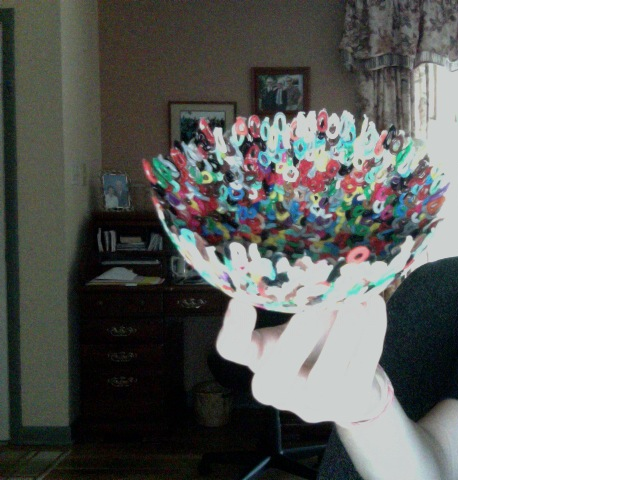 |
| Finished product. |
 |
| In the oven |
Tuesday, April 24, 2012
Fireflies
 |
| My Mom so nicely gave me one of her Mason Jars |
 |
| I used Tulip Glow Paint and the end of a paint brush |
So recently I became obsessed with Pinterest. Everyone was talking about it, I did not understand how someone could be addicted to looking at pictures until it happened to me. About a month ago I started spending hours on the computer staring at other people's creativity. Until a thought crossed my mind "Hey I could be making these cool projects too!" So I got right to work I decided on painting the inside of a mason jar to give it the effect like fireflies had been trapped inside. Part of the reason this craft was so appealing to me is because every fourth of July my family makes the long drive out to Missouri so we can see my Moms side of the family. Me and my two cousins who are both a year younger than me loved catching fireflies when we were little. Always wanting to keep them on our bedside table my Grandma would give us some of her Mason Jars that she would use for canning. We then trapped the poor bugs until they died in our jars, somehow I now find this kind of cruel. Anyway that is why I loved this craft idea, I already have plans to keep it on my nightstand.
It took about an hour, I dipped the end of a paintbrush into GLOW paint and made little dots all around the jar. Simple, fun, and pretty although the original jar I saw on Pinterest used more than one color glow paint so theirs shows up way better in pictures. My jar glows quite bright at night I actually moved it across the room because I could not sleep with it next to me.
 |
| My jar faintly glowing (Unfortunately I could not get a good picture) |
Subscribe to:
Posts (Atom)